


Post by Head Righter on Mar 11, 2024 19:00:53 GMT 10

Max as the Crocodile Dennis as Deer Head Aunt Diana Rigg as Narrator Vanessa as Queen Isobel Robert as Justice Shawcroft Sandra as Margaret Jonathan as Ol' Neighbour Joe Max as Plate Chris as Prince Richard Chris as Ebenezer Scrooge Sir David Suchet as Narrator Robert as Irrelevant Trumpeter Annie as Mrs. Wimblegate
Hello, dear Animals, and welcome to the Food Chain game!
All 13 of you have been assigned a different Animal role to play with. Apparently this was based on something to do with cake slices? (Is that a euphemism? Serious, we're not sure.) And now you'll be playing and trying to win as that Animal.
Here's a basic overview of how the game works:
- There are 13 different Animals - you'll be introduced to them in a moment.
- The Animals have different victory conditions you'll be trying to acheive.
- There are 4 different Habitats.
- The game lasts for 4 Rounds.
- Before each Round begins, you'll pick a Habitat to visit. You'll then spend the entire Round there, with whoever else chose that same Habitat.
- While in that Habitat together, you can choose whether to Attack another Animal. If the attacker is higher on the Food Chain than the defender they've targeted, they'll kill and eat the defender
 (It's very natural, but still very sad.)
- However, some Animals can die without losing! Because of the differing 'victory conditions'.
- Any player who meets their victory condition will be one of the winners of Food Chain. And they will get to cast a Vote at the end of this Episode.
- Any players who fail to meet their victory condition will have lost at Food Chain. And instead of having a Vote to cast, they'll be eligible to receive Votes.
Peeking
Before the game starts, we're going to have a Planning Phase which will last for 12 hours. So you'll have time to read these instructions carefully, ask any questions, and also discuss everything with your Tribe - though once Food Chain gets underway, it will become an Individual game rather than a Tribal one. One of the most important aspects of this game will be deducing what Animal roles the other players have been assigned, and thus whether you can Attack them, or whether they might Attack you.
To help with this, you all have the chance to Peek at one player's Animal identity, before Round 1 begins. And you've actually already started this process, with your list of 'Suspicious Actors' last round. At some point during the Planning Phase, the Crew will stop by your Confessional and show you the Animal assigned to the highest player on your Suspicious Actors list (who was not eliminated last round - which is why it needed to be a list).
The 'Patron' Animals (see below) have a special ability which allows them to Peek at two players - they will get Peeks at the two highest players on their Suspicous Actors list, who are not eliminated from the Game.
And I'll also note here that one Animal - the Octopus - has a special ability which disguises its identity during the Peeking process. So if you do happen to Peek at the Octopus, you won't be told they're the Octopus; you'll 'see' them as the Animal they're disguised as instead.
Habitats
The four Habitats are: the Coral Reef, the Island Sands, the Kelp Forest and the Open Ocean
Every Animal has a home Habitat. And because there's no place like home, you can't stay away for more than a single Round. This means that any Animal who leaves their home Habitat for a Round must return Home for the following Round.
The Island Sands is a restricted Habitat, because most of the Animals cannot go there. It is only accessible to the Polar Bear, Sea Lion, Turtle and Octopus who can all survive temporarily on land, and the tiny Pilot Fish which can apparently squeeze along the island's narrow streams. The other three Habitats are open to everybody.
Before each Round begins, you should go to you Decisions thread and confirm which Habitat you'd like to go visit next. You can change your mind up until the new Round begins, at which point we'll move you directly into the last Habitat you named in your Decisions thread, for the upcoming Round. (Unless you've tried to stay away from your home Habitat too long, in which case we'll override your decision and return you there.)
Meet the Predators!
It's time to take a tour of the local fauna. How exciting! But we'll be starting with the ones that are also the most terrifying - the Predators:


These four Animals make up the top of the Food Chain. You'll notice that they're all outlined in white, and that their names match the colouring we've used for their home Habitats.
They're also shown in the order of their tiers on the Food Chain, meaning that they can all eat any Animal below them. So the Orca (Tier 1 in the Food Chain) can eat all the rest. The Shark (Tier 2) can eat anyone but the Orca. The Polar Bear (Tier 3) can eat the Eel. And the Eel (Tier 4) can't eat any of the other Predators... but it's still above every other Animal still to come in the Food Chain.
Most of the Predators have a simple victory condition - survive through all four Rounds. The exception is the Eel, whose victory condition is that the Orca loses. Which means the Eel is the first Animal we've met who can attain their victory condition even if they die.
Because the Predators are so powerful, they come with a tradeoff which is they can all starve and die if they go for too long without eating:
- The Orca must Attack every single Round. If it goes a whole Round without eating, it will starve and die.
- The Shark and the Polar Bear must eat in at least three out of the four Rounds. They can skip a meal once, but if they ever go a second round (consecutive or not) without making a successful attack, they will starve and die.
- The Eel must eat in at least two out of the four rounds. It can skip eating in two Rounds, but then if it ever goes a third Round (consecutive or not) without making a successful attack, it will starve and die.
Meet the Prey Animals!
Every other Animal in this game belongs in Tier 5. However, only these next four are known as the 'Prey Animals':


All of them start with 'Sea' which will make them easier to remember
 They also once again share an outline colour - a light blue. And their names are coloured to match their home Habitats.
 The Prey Animals all have the same victory condition - survive through all four Rounds. To help them do so, they also have a special ability: if all the surviving Prey Animals are together in the same Habitat, none of them can die. So if one of these four Animals has already died, but the other three find themselves in the same Habitat, any Predator trying to Attack them there will fail. And if at some point three of the four have been killed, the final surviving Prey Animal will become invincible.
The Sea Lion's ability to access the Island Sands is balanced out by an extra victory condition which is specific to them only: the Sea Lion must visit the Open Ocean at least once during the first three Rounds. If they fail to do so, they will die.
Meet the Patron Animals!


These Animals are in a symbiotic relationship with some of the Predators, and their primary concern is for the Predator's well-being.
Thus the victory condition for the Sucker Fish is that the Orca survives; if the Orca wins so does the Sucker Fish. And the victory condition for the Pilot Fish is that the Shark survives; if the Shark wins so does the Pilot Fish. This means that the Patron Animals can get eaten and still come out of the Food Chain game with a victory.
Because their success will depend upon the information available to them, both Patron Animals have the special ability to Peek at two different players during the Planning Phase, as explained above. And for easy identification, they are displayed above in a dull greyish-blue.
Meet the Peculiar Animals!
The last three Animals to meet don't fit into any neat categories, and each have their own exceptional rules and victory conditions:


The Octopus has the basic victory condition of surviving all four rounds. However, it can disguise itself as another Animal of its choice. During the Planning Phase, the Octopus will need to choose which Animal to use as a disguise, and anybody who Peeks at them will be told their role is that chosen Animal, rather than the Octopus. If you are the Octopus and currently reading this, please submit your Decision ASAP!
The Turtle operates like a Patron Animal, but gets to choose which Animal role to attach themselves to. So during the Planning Phase, the Turtle will need to submit a Decision naming one of the other Animals. If the Animal they chose meets their own victory condition (whatever it may be), then so will the Turtle. If the Animal they chose fails to fulfill their victory condition, the Turtle will also lose at theirs. Like the Patron Animals, the Turtle gets to Peek at two players during the Planning Phase.
Finally, the Pufferfish is highly toxic and poisonous to any Animals who try to eat it. The Pufferfish can never die, and if anyone tries to Attack it, that attacker will die instead. The victory condition for the Pufferfish is that nine or more of the thirteen Animals die during the four Rounds of the game. If fewer than nine deaths occur by the end of the final Round, the Pufferfish will fail to meet its victory condition.
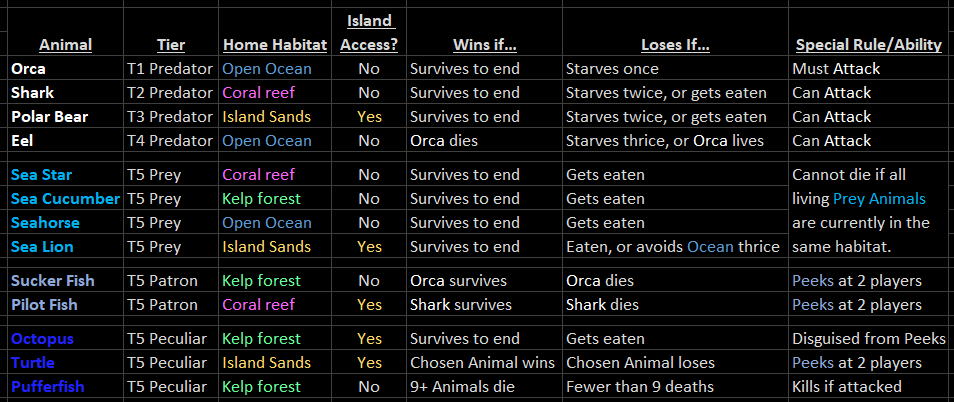
There are a lot of details to take in here, and it's not hard to get them mixed up. So here is a handy table with a summary you can use for reference:
Attacking & Dying
Only the four Predators can make a successful Attack, but in theory anybody can attempt to make one. You'll need this image:

To attempt an Attack, post that Attack image in a Habitat's thread, before the Round ends, and name the player you are choosing to Attack (in the same post). The Crew will then come by as soon as they can to confirm whether or not the Attack succeeded.
- If the attacker is in a tier above the defender's tier, the Crew will confirm the Attack was successful and the defender will die.
- If the attacker is in a lower tier, or if the attacker and defender are both in the same tier, the Crew will announce the Attack has failed, and nothing else will happen.
- If multiple Attacks occur within a short timeframe, we will resolve them in the order they were posted.
Attacks which fail will never be announced to anyone outside that Habitat. But if/when a player dies, we will announce their death where all the Animals can see it, without revealing the details of how they died to anyone outside the Habitat where the death occurred. We also won't be revealing/confirming anybody's Animal role until after all four Rounds have finished.
Players who die during Food Chain will be sent into a faux-Habitat for the Deceased. There will be a new thread in this sub-board every Round, just like in the proper Habitats.
If you are waiting to find out the results of an Attack attempt, and are worried that you will be offline and unable to return before the end of the Round to see the outcome, please tag the Head Righter (type "@headrighter") in your Decisions thread - I'm taking over his account for now. Then you may leave instructions about an action you'd like us to take on your behalf, should the Attack prove un/successful. And if you don't come back online, we will follow your instructions right before the Round is due to end, and announce the outcome.
For instance, if you have an Predator Animal role which needs to eat to survive, you might want to follow up an unsuccessful Attack by trying to Attack somebody else instead. If you're about to go offline and are worried an Attack you've tried to make may prove unsuccessful - then you can tell us to Attack a second player on your behalf, if the first Attack fails.
If you have been Attacked and are waiting to discover whether or not you have been killed, but wish to make an Attack of your own in the event that you survive. You can just go ahead and post your Attack in the Habitat thread - because we'll resolve each Attack in the order that they were posted there. So if you survive the Attack against you, the Crew will immediately count your later Attack as a valid attempt and resolve that too.
Timing & Procedure
Here's how we're going to be able to play Food Chain non-live and across all the different timezones. It will be the only time in this ORG that the deadlines may not fall on our regular 8-hour blocks, so please read this carefully and don't worry about timezone conversions just yet - we'll do all that for you on the Casting Notices board as we go:
- The Planning Phase begins now, 8:00pm AEDT Monday. It will run for 12 hours, until 8:00am AEDT Tuesday.
- The four rounds will last up to 9 hours each. So if we stick to this schedule - Round 2 will begin at 5:00pm AEDT Tuesday; Round 3 will begin at 2:00am AEDT Wednesday; Round 4 will begin at 11:00am AEDT Wednesday and it will end at 8:00pm AEDT Wednesday.
- The Voting Phase will then last 24 hours, ending at 8:00pm GMT Thursday.
However, it is likely that we will be able to run the later Rounds faster than this. This is because once fewer Animals are alive there are likely to be rooms with very few players in them, and very few decisions to make during the Rounds. We do not want anyone still alive in the Food Chain game to be sleeping through an entire Round, so please let us know privately if there is ever a danger of that, and we will stick to the above schedule if we have to in order to keep things fair. But if everyone still alive is able to check in and confirm that they have nothing left to do in a given Round - even the Planning Phase, perhaps - we will move on earlier and get to the end of the Episode sooner.
So please watch the Casting Notices board for updates about the timeline, and anonymous polls about moving on. We'll tag you any time we're proposing or confirming a schedule change, and won't shorten any Rounds unless we're absolutely certain that nobody will lose out.
The most important thing we need you to do, to ensure that we can move between Rounds smoothly and efficiently, is to post your Habitat selections in advance. In fact, we'd like you to go to your Decisions thread right now, and copy/paste, then fill in this Habitat selection form:
Round 1 Habitat:
Round 2 Habitat:
Round 3 Habitat:
Round 4 Habitat:
Like your Votes in a regular Episode, you can update your Habitat selections whenever you wish, for any/all future Rounds. When a new Round is set to begin - even if it begins earlier than originally planned - we will move everyone to new Habitats based upon the most recent post they made in their Decisions thread, which mentioned a Habitat for the Round about to begin. If for some reason you do not leave a Habitat Selection for an upcoming Round, you will default to your Animal's home Habitat.
Communication
The last thing you need to know is that from this moment your communications are restricted:
- If you are sharing a Habitat with somebody, you are not allowed to PM them at all. You can however talk by posting in that Habitat's main thread, for everyone there to see. Note that during the Planning Phase, your Tribe Camp boards are considered your 'Habitat'. So right now you cannot send a regular PM to anybody who is on your Tribe.
- You can have limited communication with people who are not in your Habitat (or on your Tribe, during the Planning Phase), by sending them Miniature Parchments (MPs). These have some extremely specific rules and limitations, so please do not even touch your Inbox until you have read and understood everything in the Miniature Parchments thread.
And that's everything! I know it's a lot but that's why we're giving you a Planning Phase to take it in and ask your questions. After that you'll be living through it all for the next few days, hopefully.
And when in doubt you can fall back on the basic decisions you need to make each round: which Habitat to go to, whether you want to make an Attack there, and then whom you wish to Attack. Rinse and repeat four times, and then see whether your victory condition is met. It's actually relatively simple when you think of it that way